目录
- 前言
- 一 配置内网dns A记录和MX记录
- 二 mail服务器初始化配置
- 1. 修改主机名
- 2. 关闭防火墙与selinux
- 3. 开启时间同步
- 4. 安装软件
- 三 修改配置文件
- 1 配置postfix
- 2 配置dovecot
- 2.1 配置监听协议:
- 2.2 配置登录方式:
- 2.3 配置邮件存储位置:
- 2.4 配置ssl(关闭):
- 3 配置sasl2
- 3.1 配置系统认证:
- 3.2 配置登录方式:
- 4 启动服务:
- 5 创建用户并设置pass
- 6 配置mailx:
- 四 发送邮件测试
- 1 命令行发送邮件测试
- 2 使用使用foxmail登录并发送邮件测试
- 五 报错
- 1 权限被拒绝
- 2 无法找到主机:
- 3 邮件被拒绝
前言由于公司zabbix 监控告警邮件发送量过打 , 使用的腾讯企业邮箱会出现漏发或发送频率过快而拒绝发送的情况 , 所以现在使用自主搭建的内网邮件服务器来负责zabbix告警邮件的发送 。
内网的告警邮件服务器只能给其他(腾讯企业邮箱 , 网易邮箱等)邮箱发送邮件 , 而不能接受其他邮箱的回邮件 , 如想可以收到回件需要购买域名配置A记录和MX记录 , 本文档不再讲解 。
一 配置内网dns A记录和MX记录我在内网使用的域名主机是dnsmasq代理软件 , 其使用简单 , 方便 , 多样化 。详细配置可查看其他文档 。
[root@dns_proxy ~]# grep liqing /etc/dnsmasq.confaddress=/mail.liqing-test.top/192.168.2.100mx-host=liqing-test.top,mail.liqing-test.top,10
二 mail服务器初始化配置
1. 修改主机名[root@localhost /]# hostnamectl --static set-hostname mail.liqing-test.top|bash
2. 关闭防火墙与selinux[root@mail /]# systemctl stop iptables && systemctl disable iptables[root@mail /]# systemctl stop firewalld && systemctl disable firewalld[root@mail /]# setenforce 0
3. 开启时间同步[root@mail /]# yum -y install ntpdate && ntpdate ntp.aliyun.com
4. 安装软件[root@mail /]# yum-yinstallpostfixdovecotcyrus-sasl-*mailx
三 修改配置文件注释:配置文件备份操作本文档自行操作
1 配置postfix[root@mail /]# cat /etc/postfix/main.cfmail_owner = postfixmyhostname = mail.liqing-test.topmydomain = liqing-test.topmyorigin = $mydomaininet_interfaces = allinet_protocols = ipv4mydestination = $myhostname, localhost.$mydomain, localhost, $mydomain, mail.$mydomain, www.$mydomain, ftp.$mydomainlocal_recipient_maps =mynetworks = 0.0.0.0/0relay_domains = $mydestinationalias_maps = hash:/etc/aliasesalias_database = hash:/etc/aliasessmtpd_banner = $myhostname ESMTP# 在最下面新增smtpd_sasl_type = dovecotsmtpd_sasl_path = private/authsmtpd_sasl_local_domain =smtpd_sasl_auth_enable = yessmtpd_sasl_security_options = noanonymousbroken_sasl_auth_clients = yessmtpd_recipient_restrictions = permit_mynetworks,permit_auth_destination,permit_sasl_authenticatedsmtpd_client_restrictions = permit_sasl_authenticated
2 配置dovecot
2.1 配置监听协议:[root@mail /]# cat /etc/dovecot/dovecot.confprotocols = imap pop3 lmtplisten = *login_trusted_networks = 0.0.0.0/0dict {}!include conf.d/*.conf!include_try local.conf
2.2 配置登录方式:[root@mail /]# cat /etc/dovecot/conf.d/10-auth.confdisable_plaintext_auth = noauth_mechanisms = plain login!include auth-system.conf.ext
2.3 配置邮件存储位置:[root@mail /]# cat /etc/dovecot/conf.d/10-mail.confmail_location = mbox:~/mail:INBOX=/var/mail/%unamespace inbox {inbox = yes}first_valid_uid = 1000mbox_write_locks = fcntl[root@mail /]# cat /etc/dovecot/conf.d/10-master.conf service auth {unix_listener /var/spool/postfix/private/auth {mode = 0666user = postfixgroup = postfix}}
2.4 配置ssl(关闭):[root@mail /]# cat /etc/dovecot/conf.d/10-ssl.conf ssl = no
3 配置sasl2
3.1 配置系统认证:[root@mail /]# cat /etc/sysconfig/saslauthd SOCKETDIR=/run/saslauthdMECH=shadowFLAGS=
3.2 配置登录方式:[root@mail /]# cat /etc/sasl2/smtpd.confpwcheck_method: saslauthdmech_list: PLAIN LOGINlog_level:3
4 启动服务:systemctlrestartdovecotsystemctlrestartpostfixsystemctlrestartsaslauthdsystemctlenable dovecotsystemctlenablepostfixsystemctlenablesaslauthd
5 创建用户并设置pass[root@mail /]# useradd -m autumn && echo 123456 | passwd --stdin autumn[root@mail /]# su - autumn [autumn@mail ~]$ mkdir -p ~/mail/.imap/INBOX[autumn@mail ~]$ chmod -R 750 ~/mail #(这不操作不做会在使用foxmail登录时报错{Error: Couldn't open INBOX: Permission denied})[autumn@mail ~]$ exit
6 配置mailx:[root@mail /]# cat /etc/mail.rcset from=autumn@liqing-test.topset smtp=mail.liqing-test.topset smtp-auth-user=autumnset smtp-auth-password=123456set smtp-auth=login
四 发送邮件测试
1 命令行发送邮件测试[root@mail /]# echo"邮件服务器测试"|mail-s"邮件服务器测试"other-email@163.com
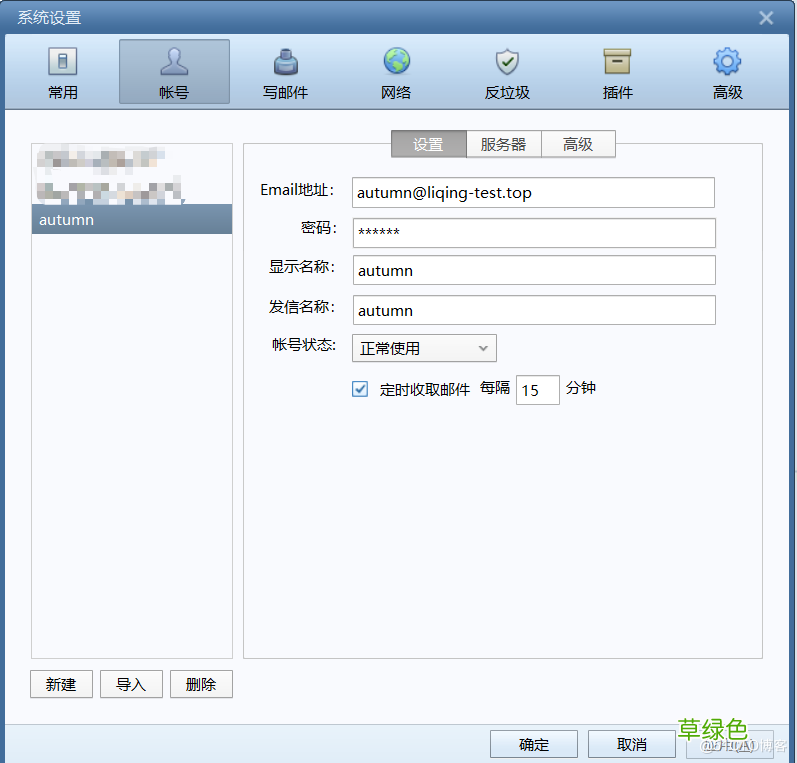
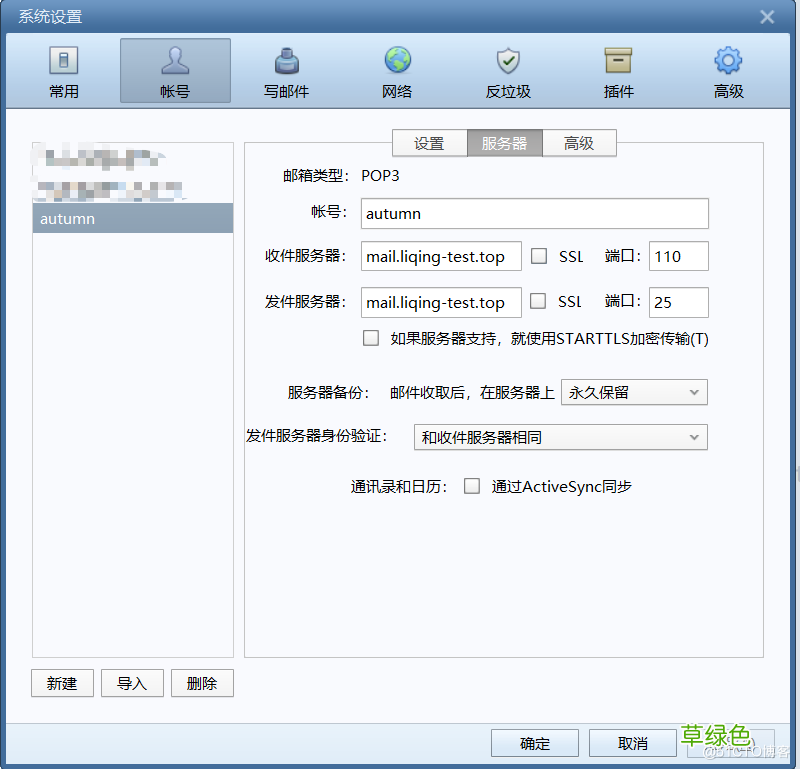
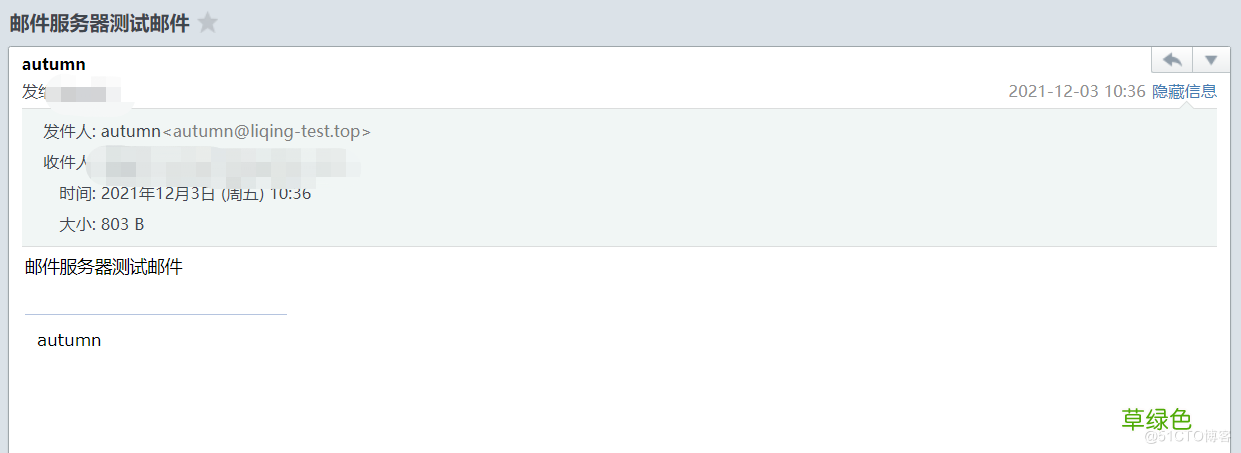
2 使用使用foxmail登录并发送邮件测试
文章插图
文章插图
文章插图
五 报错
1 权限被拒绝在使用foxmail登录邮箱时提示权限被拒绝 , 这是因为在邮箱用户的家目录下mail文件权限不是750 , 设置为750后解决 。
[autumn@mail ~]$ chmod -R 750 ~/mailDec3 10:15:35 Git-server dovecot: pop3-login: Login: user=, method=PLAIN, rip=192.168.31.100, lip=192.168.2.100, mpid=24843, secured, session=
Dec3 10:15:35 Git-server dovecot: pop3(autumn): Error: fchown(/home/autumn/mail/.imap, group=12(mail)) failed: Operation not permitted (egid=1004(autumn), group based on /var/mail/autumn - see http://wiki2.dovecot.org/Errors/ChgrpNoPerm)
Dec3 10:15:35 Git-server dovecot: pop3(autumn): Error: Couldn't open INBOX: Permission denied
Dec3 10:15:35 Git-server dovecot: pop3(autumn): Couldn't open INBOX: Permission denied top=0/0, retr=0/0, del=0/0, size=0
Dec3 10:16:26 Git-server dovecot: pop3-login: Login: user=, method=PLAIN, rip=192.168.31.100, lip=192.168.2.100, mpid=24895, secured, session=
Dec3 10:16:26 Git-server dovecot: pop3(autumn): Error: fchown(/home/autumn/mail/.imap, group=12(mail)) failed: Operation not permitted (egid=1004(autumn), group based on /var/mail/autumn - see http://wiki2.dovecot.org/Errors/ChgrpNoPerm)
2 无法找到主机:邮件在发送时会根据邮件地址的解析记录去查找mx记录 , 这里我在向腾讯的企业邮箱发送测试邮件时找不到腾讯的邮箱地址 。我在内网的dns代理中加入了腾讯的mx记录后解决
[root@dns- ~]# grep qq /etc/dnsmasq.conf mx-host=***.com,mxbiz2.qq.com,10mx-host=***.com,mxbiz1.qq.com,5
Dec3 10:36:14 Git-server postfix/smtpd[26216]: connect from unknown[192.168.31.100]
Dec3 10:36:15 Git-server postfix/smtpd[26216]: 05C682267F04: client=unknown[192.168.31.100], sasl_method=LOGIN, sasl_username=autumn
Dec3 10:36:15 Git-server postfix/cleanup[26220]: 05C682267F04: message-id=<202112031036171922345@liqing-test.top>
Dec3 10:36:15 Git-server postfix/qmgr[25430]: 05C682267F04: from=, size=1561, nrcpt=1 (queue active)
Dec3 10:36:15 Git-server postfix/smtpd[26216]: disconnect from unknown[192.168.31.100]
Dec3 10:36:15 Git-server postfix/smtp[26221]: 05C682267F04: to=<***@***.com>, relay=none, delay=0.11, delays=0.08/0.02/0/0, dsn=4.4.3, status=deferred (Host or domain name not found. Name service error for name=***.com type=MX: Host not found, try again)
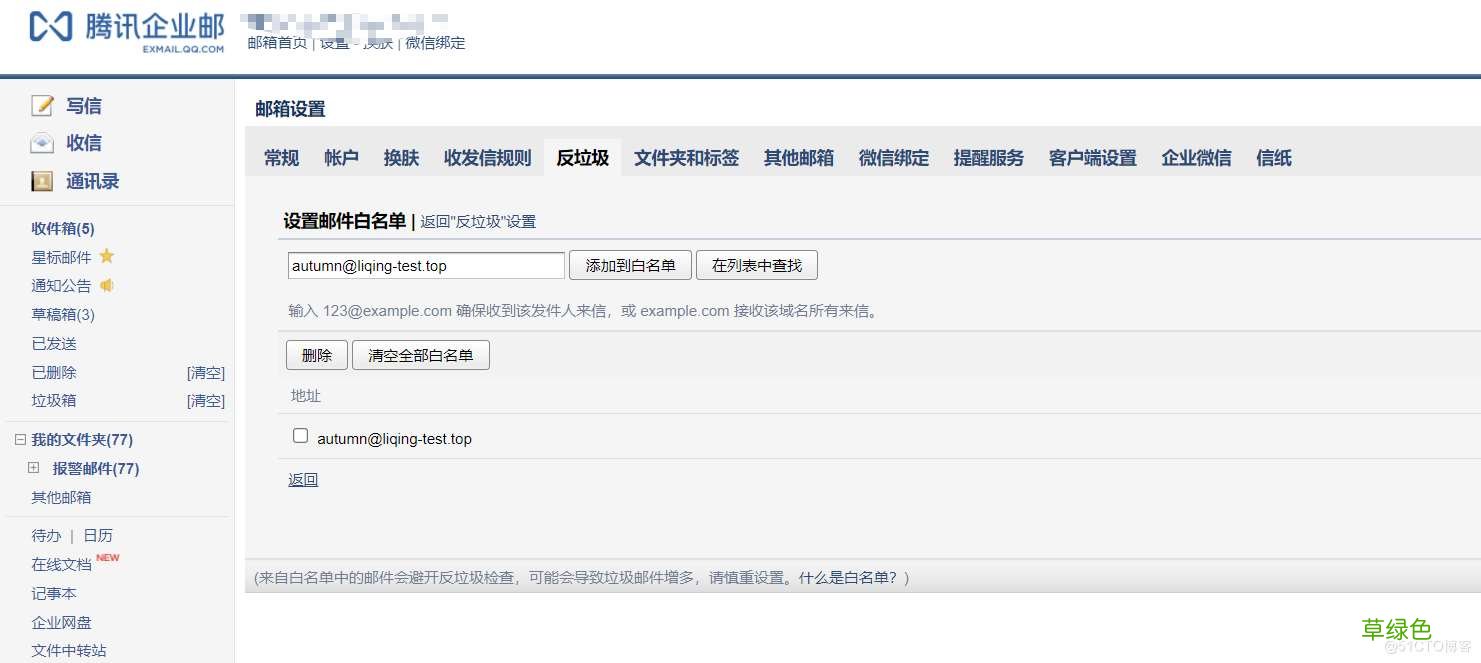
3 邮件被拒绝在我向腾讯企业邮箱发送测试邮件时日志里出现了550邮件连接被拒绝的情况 , 此情况在邮件中设置白名单后解决 。
文章插图
Dec3 10:11:57 Git-server postfix/smtpd[24617]: connect from mail.liqing-test.top[192.168.2.100]
Dec3 10:11:57 Git-server postfix/smtpd[24617]: 4E2292267F04: client=mail.liqing-test.top[192.168.2.100], sasl_method=LOGIN, sasl_username=autumn
Dec3 10:11:57 Git-server postfix/cleanup[24621]: 4E2292267F04: message-id=<61a97cec.xRtXn6hYj3NI3wI3%autumn@liqing-test.top>
Dec3 10:11:57 Git-server postfix/qmgr[24504]: 4E2292267F04: from=, size=541, nrcpt=1 (queue active)
Dec3 10:11:57 Git-server postfix/smtpd[24617]: disconnect from mail.liqing-test.top[192.168.2.100]
Dec3 10:11:58 Git-server postfix/smtp[24622]: 4E2292267F04: to=<***@***.com>, relay=mxbiz1.qq.com[183.57.48.34]:25, delay=1.6, delays=0.09/0.03/0.16/1.3, dsn=5.0.0, status=bounced (host mxbiz1.qq.com[183.57.48.34] said: 550 Mail content denied. http://service.exmail.qq.com/cgi-bin/help?subtype=1&&id=20022&&no=1000726 (in reply to end of DATA command))
【Centos7.9搭建自主邮件服务器详细步骤】到此这篇关于Centos7.9搭建自主邮件服务器详细步骤的文章就介绍到这了,更多相关Centos搭建邮件服务器内容请搜索考高分网以前的文章或继续浏览下面的相关文章希望大家以后多多支持考高分网!
- 春季老年人吃什么养肝?土豆、米饭换着吃
- 三八妇女节节日祝福分享 三八妇女节节日语录
- 老人谨慎!选好你的“第三只脚”
- 校方进行了深刻的反思 青岛一大学生坠亡校方整改校规
- 脸皮厚的人长寿!有这特征的老人最长寿
- 长寿秘诀:记住这10大妙招 100%增寿
- 春季老年人心血管病高发 3条保命要诀
- 眼睛花不花要看四十八 老年人怎样延缓老花眼
- 香槟然能防治老年痴呆症? 一天三杯它人到90不痴呆
- 老人手抖的原因 为什么老人手会抖