目录
- 拉取一个centos镜像
- 基于centos生成nginx容器
- 基于centos生成mysql容器
- 基于centos生成php容器
- 制作镜像
- 用新镜像创建lnmp容器
- 测试
拉取一个centos镜像//下载centos镜像[root@localhost ~]# docker pull centosUsing default tag: latestlatest: Pulling from library/centosa1d0c7532777: Pull complete Digest: sha256:a27fd8080b517143cbbbab9dfb7c8571c40d67d534bbdee55bd6c473f432b177Status: Downloaded newer image for centos:latestdocker.io/library/centos:latest//查看镜像[root@localhost ~]# docker imagesREPOSITORYTAGIMAGE IDCREATED SIZEcentoslatest5d0da3dc97642 months ago231MB
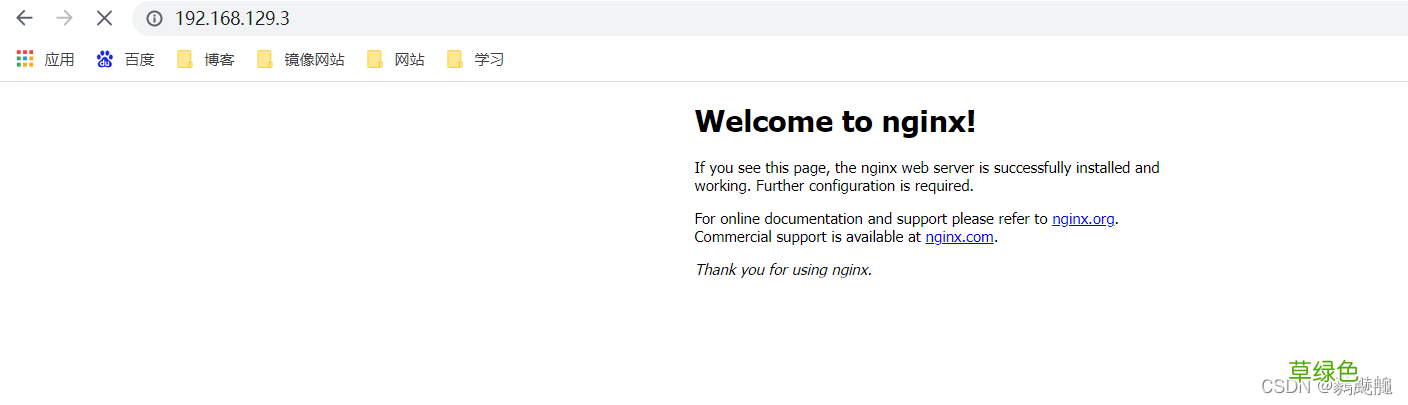
基于centos生成nginx容器//使用镜像启动容器并进入容器[root@localhost ~]# docker run -it --name centos_nginx centos /bin/bash[root@c193fcb41eae /]# yum -y install pcre-devel openssl openssl-devel gd-devel gcc gcc-c++ vim which make wget[root@c193fcb41eae /]# yum -y groups mark install 'Development Tools'//创建用户和组[root@c193fcb41eae /]# useradd -r -M -s /sbin/nologin nginx//创建日志存放目录[root@c193fcb41eae /]# mkdir -p /var/log/nginx[root@c193fcb41eae /]# chown -R nginx.nginx /var/log/nginx//下载安装包以及解压[root@c193fcb41eae /]# cd /usr/src/[root@c193fcb41eae src]# wget http://nginx.org/download/nginx-1.21.4.tar.gz[root@c193fcb41eae src]# lsdebugkernelsnginx-1.21.4.tar.gz[root@c193fcb41eae src]# tar xf nginx-1.21.4.tar.gz //编译安装[root@c193fcb41eae src]# cd nginx-1.21.4[root@c193fcb41eae nginx-1.21.4]# ./configure \--prefix=/usr/local/nginx \--user=nginx \--group=nginx \--with-debug \--with-http_ssl_module \--with-http_realip_module \--with-http_image_filter_module \--with-http_gunzip_module \--with-http_gzip_static_module \--with-http_stub_status_module \--http-log-path=/var/log/nginx/access.log \--error-log-path=/var/log/nginx/error.log[root@c193fcb41eae nginx-1.21.4]# make -j $(grep 'processor' /proc/cpuinfo | wc -l) && make install [root@c193fcb41eae nginx-1.21.4]# echo 'export PATH=/usr/local/nginx/sbin:$PATH' > /etc/profile.d/nginx.sh[root@c193fcb41eae nginx-1.21.4]# . /etc/profile.d/nginx.sh[root@c193fcb41eae nginx-1.21.4]# which nginx/usr/local/nginx/sbin/nginx[root@localhost ~]# docker exec -it nginx05/bin/bash[root@c193fcb41eae /]# ss -antlStateRecv-Q Send-QLocal Address:PortPeer Address:PortLISTEN0128*:80 [root@c193fcb41eae /]# vi /usr/local/nginx/conf/nginx.conf...... location / {roothtml;index index.php index.html index.htm;#在45行中添加index.php }...... #取消location ~ .php$ 大括号前的注释(65~71)行 location ~ \.php$ {root/var/www/html;#php测试页面目录fastcgi_pass127.0.0.1:9000;#在工作中这里要改为php服务器的地址fastcgi_indexindex.php;fastcgi_paramSCRIPT_FILENAME$document_root$fastcgi_script_name;#将/script改为$document_rootinclude fastcgi_params; } ......daemon off;#在前台运行#下根目录下创建start.sh[root@c193fcb41eae /]# cat >> start.sh <
基于centos生成mysql容器//做mysql镜像并使用容器模式的网络[root@localhost ~]# docker run -it --name mysql01 --network container:nginx05 centos:latest /bin/bash[root@3367881fd446 /]##启动本地镜像centos 在里面安装MySQL --network container:nginx05 (以nginx05容器ID为共享网络)//重新打开一个终端查看并上传mysql包[root@localhost ~]# docker psCONTAINER IDIMAGECOMMANDCREATEDSTATUSPORTSNAMES466e7f22d1f3centos:latest"/bin/bash"11 seconds agoUp 10 seconds mysql01# mysql容器正运行c193fcb41eae1314444/source_nginx:nginx-1.21.4"/usr/local/nginx/sb…"9 hours agoUp 34 minutes0.0.0.0:8080->80/tcp, :::8080->80/tcpnginx05# mysql容器正运行在这里插入代码片[root@localhost ~]# lsanaconda-ks.cfgmysql-5.7.34-linux-glibc2.12-x86_64.tar.gz[root@localhost ~]# docker cp mysql-5.7.34-linux-glibc2.12-x86_64.tar.gz mysql01:/usr/src//MySQL容器下查看[root@c193fcb41eae /]# ls /usr/src/debugkernelsmysql-5.7.34-linux-glibc2.12-x86_64.tar.gz////创建用户和组[root@c193fcb41eae /]# useradd -r -M -s /sbin/nologin mysql[root@c193fcb41eae /]# id mysqluid=998(mysql) gid=996(mysql) groups=996(mysql)//清理环境以及安装依赖包[root@c193fcb41eae /]# yum clean all[root@c193fcb41eae /]# yum -y install ncurses-devel openssl-devel openssl cmake mariadb-devel ncurses-compat-libs which numactl libaio//解压[root@c193fcb41eae /]# cd /usr/src/[root@c193fcb41eae src]# tar xf mysql-5.7.34-linux-glibc2.12-x86_64.tar.gz -C /usr/local/[root@c193fcb41eae src]# ls /usr/local/binetcgamesincludeliblib64libexecmysql-5.7.34-linux-glibc2.12-x86_64sbinsharesrc//创建软连接[root@c193fcb41eae src]# cd /usr/local/[root@c193fcb41eae local]# ln -s mysql-5.7.34-linux-glibc2.12-x86_64 mysql[root@c193fcb41eae local]# ls -ltotal 0drwxr-xr-x 2 root root6 Nov32020 bindrwxr-xr-x 2 root root6 Nov32020 etcdrwxr-xr-x 2 root root6 Nov32020 gamesdrwxr-xr-x 2 root root6 Nov32020 includedrwxr-xr-x 2 root root6 Nov32020 libdrwxr-xr-x 3 root root17 Sep 15 14:17 lib64drwxr-xr-x 2 root root6 Nov32020 libexeclrwxrwxrwx 1 root root35 Dec3 16:18 mysql -> mysql-5.7.34-linux-glibc2.12-x86_64drwxr-xr-x 9 root root 129 Dec3 16:17 mysql-5.7.34-linux-glibc2.12-x86_64drwxr-xr-x 2 root root6 Nov32020 sbindrwxr-xr-x 5 root root49 Sep 15 14:17 sharedrwxr-xr-x 2 root root6 Nov32020 src//修改属主属组[root@c193fcb41eae local]# chown -R mysql.mysql /usr/local/mysql*[root@c193fcb41eae local]# ls -ltotal 0drwxr-xr-x 2 rootroot6 Nov32020 bindrwxr-xr-x 2 rootroot6 Nov32020 etcdrwxr-xr-x 2 rootroot6 Nov32020 gamesdrwxr-xr-x 2 rootroot6 Nov32020 includedrwxr-xr-x 2 rootroot6 Nov32020 libdrwxr-xr-x 3 rootroot17 Sep 15 14:17 lib64drwxr-xr-x 2 rootroot6 Nov32020 libexeclrwxrwxrwx 1 mysql mysql35 Dec3 16:18 mysql -> mysql-5.7.34-linux-glibc2.12-x86_64drwxr-xr-x 9 mysql mysql 129 Dec3 16:17 mysql-5.7.34-linux-glibc2.12-x86_64drwxr-xr-x 2 rootroot6 Nov32020 sbindrwxr-xr-x 5 rootroot49 Sep 15 14:17 sharedrwxr-xr-x 2 rootroot6 Nov32020 src//添加环境变量[root@c193fcb41eae local]# echo 'export PATH=/usr/local/mysql/bin:$PATH' > /etc/profile.d/mysql.sh[root@c193fcb41eae local]# source /etc/profile.d/mysql.sh[root@c193fcb41eae local]# which mysql/usr/local/mysql/bin/mysql//头文件(include)、读取lib[root@c193fcb41eae local]# ln -s /usr/local/mysql/include/ /usr/local/include/mysql[root@c193fcb41eae local]# echo '/usr/local/mysql/lib' > /etc/ld.so.conf.d/mysql.conf[root@c193fcb41eae local]# ldconfig//创建数据存放目录[root@c193fcb41eae local]# mkdir -p /opt/data[root@c193fcb41eae local]# chown -R mysql.mysql /opt/data/[root@c193fcb41eae local]# ls -l /opt/data/total 0//初始化数据库[root@c193fcb41eae local]# /usr/local/mysql/bin/mysqld --initialize-insecure --user=mysql --datadir=/opt/data2021-12-03T16:29:44.502079Z 0 [Warning] TIMESTAMP with implicit DEFAULT value is deprecated. Please use --explicit_defaults_for_timestamp server option (see documentation for more details).2021-12-03T16:29:44.673278Z 0 [Warning] InnoDB: New log files created, LSN=457902021-12-03T16:29:44.703121Z 0 [Warning] InnoDB: Creating foreign key constraint system tables.2021-12-03T16:29:44.759550Z 0 [Warning] No existing UUID has been found, so we assume that this is the first time that this server has been started. Generating a new UUID: 395770aa-5456-11ec-a2ae-0242ac110003.2021-12-03T16:29:44.761730Z 0 [Warning] Gtid table is not ready to be used. Table 'mysql.gtid_executed' cannot be opened.2021-12-03T16:29:45.276899Z 0 [Warning] CA certificate ca.pem is self signed.2021-12-03T16:29:45.631478Z 1 [Warning] root@localhost is created with an empty password ! Please consider switching off the --initialize-insecure option.//生成配置文件[root@c193fcb41eae local]# cat > /etc/my.cnf <
error while loading shared libraries: libnuma.so.1: cannot open shared object file: No such file or directory//解决方法yum -y install numactl libaio
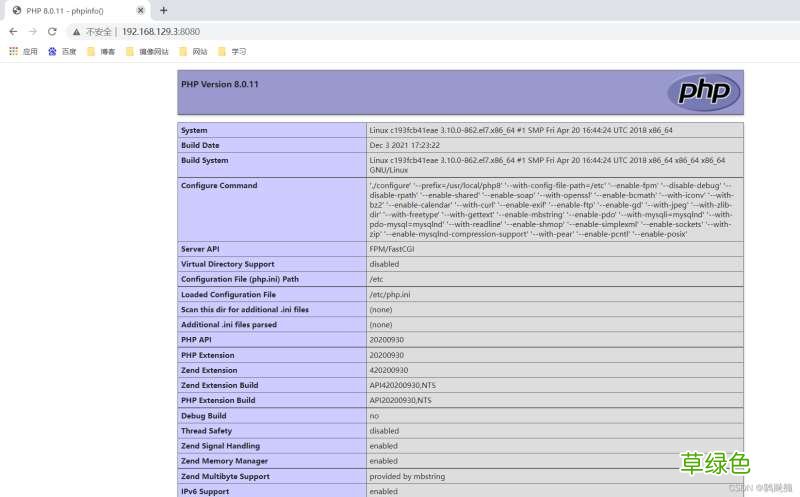
基于centos生成php容器//运行一个php容器和nginx共享网络[root@localhost ~]# docker psCONTAINER IDIMAGECOMMANDCREATEDSTATUSPORTSNAMES466e7f22d1f3centos:latest"/bin/bash"52 minutes agoUp 3 minutesmysql01c193fcb41eae1314444/source_nginx:nginx-1.21.4"/usr/local/nginx/sb…"10 hours agoUp About an hour0.0.0.0:8080->80/tcp, :::8080->80/tcpnginx05[root@localhost ~]# docker run -it --name php8 --network container:nginx05 centos:latest/bin/bash# 启动本地镜像centos 在里面安装php --network container:nginx05 (以nginx05容器ID为共享网络)[root@c193fcb41eae /]# //重新打开一个终端查看正在运行的容器[root@localhost ~]# docker psCONTAINER IDIMAGECOMMANDCREATEDSTATUSPORTSNAMES22ce0738d9d7centos:latest"/bin/bash"28 seconds agoUp 27 secondsphp8466e7f22d1f3centos:latest"/bin/bash"54 minutes agoUp 5 minutesmysql01c193fcb41eae1314444/source_nginx:nginx-1.21.4"/usr/local/nginx/sb…"10 hours agoUp About an hour0.0.0.0:8080->80/tcp, :::8080->80/tcpnginx05//清理环境并安装epel源[root@c193fcb41eae /]# yum clean all[root@c193fcb41eae /]# yum -y install epel-release//安装依赖包[root@c193fcb41eae /]# yum install sqlite-devel libzip-devel libxml2 libxml2-devel openssl openssl-devel bzip2 bzip2-devel libcurl libcurl-devel libicu-devellibjpeg-turbo libjpeg-turbo-devel libpng libpng-devel openldap-devel pcre-devel freetype freetype-devel gmp gmp-devel libmcrypt libmcrypt-devel readline readline-devel libxslt libxslt-devel mhash mhash-devel gcc gcc-c++ make which --allowerasing[root@c193fcb41eae /]# yum -y install http://mirror.centos.org/centos/8/PowerTools/x86_64/os/Packages/oniguruma-devel-6.8.2-2.el8.x86_64.rpm//打开另一个终端上传php包到容器内[root@localhost ~]# lsanaconda-ks.cfgmysql-5.7.34-linux-glibc2.12-x86_64.tar.gzphp-8.0.11.tar.gz[root@localhost ~]# docker cp php-8.0.11.tar.gz 22ce0738d9d7:/usr/src///解压[root@c193fcb41eae /]# ls /usr/src/debugkernelsphp-8.0.11.tar.gz[root@c193fcb41eae /]# cd /usr/src/[root@c193fcb41eae src]# tar xf php-8.0.11.tar.gz -C /usr/local/[root@c193fcb41eae src]# cd /usr/local/[root@c193fcb41eae local]# lsbinetcgamesincludeliblib64libexecphp-8.0.11sbinsharesrc//编译并安装[root@c193fcb41eae local]# cd php-8.0.11/[root@c193fcb41eae php-8.0.11]# ./configure --prefix=/usr/local/php8\--with-config-file-path=/etc \--enable-fpm \--disable-debug \--disable-rpath \--enable-shared \--enable-soap \--with-openssl \--enable-bcmath \--with-iconv \--with-bz2 \--enable-calendar \--with-curl \--enable-exif\--enable-ftp \--enable-gd \--with-jpeg \--with-zlib-dir \--with-freetype \--with-gettext \--enable-mbstring \--enable-pdo \--with-mysqli=mysqlnd \--with-pdo-mysql=mysqlnd \--with-readline \--enable-shmop \--enable-simplexml \--enable-sockets \--with-zip \--enable-mysqlnd-compression-support \--with-pear \--enable-pcntl \--enable-posix &&make && make install//添加环境变量[root@c193fcb41eae php-8.0.11]# echo 'export PATH=/usr/local/php8/bin:$PATH' > /etc/profile.d/php.sh[root@c193fcb41eae php-8.0.11]# source /etc/profile.d/php.sh[root@c193fcb41eae php-8.0.11]# which php/usr/local/php8/bin/php//配置php-fpm文件[root@c193fcb41eae php-8.0.11]# \cp php.ini-production /etc/php.ini[root@c193fcb41eae php-8.0.11]# cp sapi/fpm/init.d.php-fpm /etc/init.d/php-fpm[root@c193fcb41eae php-8.0.11]# chmod +x /etc/init.d/php-fpm[root@c193fcb41eae php-8.0.11]# cp /usr/local/php8/etc/php-fpm.conf.default /usr/local/php8/etc/php-fpm.conf[root@c193fcb41eae php-8.0.11]# cp /usr/local/php8/etc/php-fpm.d/www.conf.default /usr/local/php8/etc/php-fpm.d/www.conf[root@c193fcb41eae /]# mkdir -p /var/www/html[root@c193fcb41eae /]#cat > /var/www/html/index.php <
文章插图
制作镜像[root@localhost ~]# docker psCONTAINER IDIMAGECOMMANDCREATEDSTATUSPORTSNAMESb8aff1ca0d45centos:latest"./start.sh"4 seconds agoUp 3 secondsphp8cb81cdc671e4centos:latest"./start.sh"8 minutes agoUp 8 minutesmysql01c193fcb41eaenginx:latest"/usr/local/nginx/sb…"11 minutes agoUp 11 minutes0.0.0.0:8080->80/tcp, :::8080->80/tcpnginx05//制作nginx镜像[root@localhost ~]# docker commit -a ' hhr 123@qq.com' -c 'CMD ["/usr/local/nginx/sbin/nginx"]' nginx05 1314444/lnmp:nginx-v0.1sha256:ae3a6692a4c0c3a615bdf08ad2941a8526c0acda2b6b6b21dfb625407280ac25//制作mysql镜像[root@localhost ~]# docker commit -a ' hhr 123@qq.com' -c 'CMD ["./start.sh"]' mysql01 1314444/lnmp:mysql-v0.1sha256:ff7d2b91b948baf5ecde42ad6783d80b00fb4c18bc3edc3e9d907f2a7b0e8b96//制作php镜像[root@localhost ~]# docker commit -a ' hhr 123@qq.com' -c 'CMD ["./start.sh"]' php8 1314444/lnmp:php8-v0.1sha256:359cf3ac83b0faea8d17fa4ba7eb3ed149b4ab68b8f625ed20e049d73a2c78ee[root@localhost ~]# docker imagesREPOSITORYTAG IMAGE IDCREATEDSIZE1314444/lnmpphp8-v0.1359cf3ac83b07 seconds ago1.56GB1314444/lnmpmysql-v0.1 ff7d2b91b9484 minutes ago3.81GB1314444/lnmpnginx-v0.1 ae3a6692a4c07 minutes ago551MBcentoslatest5d0da3dc97642 months ago231MB
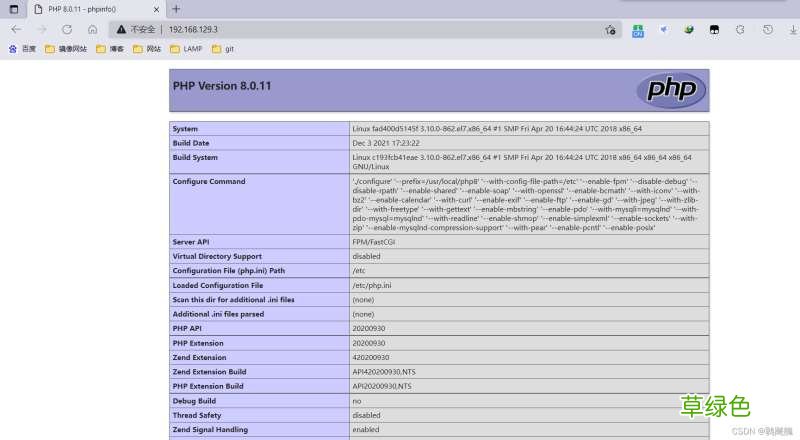
用新镜像创建lnmp容器//启动nginx容器[root@localhost ~]# docker psCONTAINER IDIMAGECOMMANDCREATEDSTATUSPORTSNAMES[root@localhost ~]# docker run -d --name nginx -p 80:80 1314444/lnmp:nginx-v0.1fad400d5145fea77e336200b915fd2321a9ee3c14d0bf8ecb9fe112f8e2b9106[root@localhost ~]# docker psCONTAINER IDIMAGECOMMANDCREATEDSTATUSPORTSNAMESa5346a4eb92bae3a6692a4c0"./start.sh"10 seconds agoUp 9 seconds0.0.0.0:80->80/tcp, :::80->80/tcpnginx[root@localhost ~]# docker exec -it nginx /bin/bash[root@a5346a4eb92b /]# ss -anltStateRecv-QSend-QLocal Address:PortPeer Address:PortProcessLISTEN01280.0.0.0:800.0.0.0:*//启动mysql容器[root@localhost ~]# docker run -d --name mysql --network container:fad400d5145f 1314444/lnmp:mysql-v0.1cb81cdc671e4c266ea9d1537367ab509e1c50a9c29d6741fed632ee6c3ad1ddb[root@localhost ~]# docker psCONTAINER IDIMAGECOMMAND CREATEDSTATUSPORTSNAMES861eabb3a5b7ff7d2b91b948"./start.sh"35 seconds agoUp 34 secondsmysqla5346a4eb92bae3a6692a4c0"./start.sh"7 minutes agoUp 7 minutes0.0.0.0:80->80/tcp, :::80->80/tcpnginx[root@localhost ~]# docker exec -it mysql /bin/bash[root@a5346a4eb92b /]# ss -antlStateRecv-QSend-QLocal Address:PortPeer Address:PortProcessLISTEN01280.0.0.0:800.0.0.0:*LISTEN080*:3306*:* //启动php容器[root@localhost ~]# docker run -d --name php --network container:fad400d5145f 1314444/lnmp:php-v0.1b8aff1ca0d45033ed1f20071d98678573edec8c6c9c521fc7ddf024b01c0d0f9[root@localhost ~]# docker psCONTAINER IDIMAGECOMMANDCREATEDSTATUSPORTSNAMESb8aff1ca0d451314444/lnmp:php-v0.1"./start.sh"4 seconds agoUp 3 secondsphpcb81cdc671e41314444/lnmp:mysql-v0.1"./start.sh"8 minutes agoUp 8 minutesmysqlfad400d5145f0229f7e8313f"./start.sh"11 minutes agoUp 11 minutes0.0.0.0:80->80/tcp, :::80->80/tcpnginx[root@localhost ~]# docker exec -it php /bin/bash[root@fad400d5145f /]# ss -anltStateRecv-QSend-QLocal Address:PortPeer Address:PortProcessLISTEN01280.0.0.0:800.0.0.0:* LISTEN0128127.0.0.1:90000.0.0.0:* LISTEN080*:3306 *:*
测试
文章插图
文章插图
【Docker下部署lnmp详细步骤】到此这篇关于Docker下部署lnmp详细步骤的文章就介绍到这了,更多相关Docker部署lnmp内容请搜索考高分网以前的文章或继续浏览下面的相关文章希望大家以后多多支持考高分网!
- 春季老年人吃什么养肝?土豆、米饭换着吃
- 三八妇女节节日祝福分享 三八妇女节节日语录
- 老人谨慎!选好你的“第三只脚”
- 校方进行了深刻的反思 青岛一大学生坠亡校方整改校规
- 脸皮厚的人长寿!有这特征的老人最长寿
- 长寿秘诀:记住这10大妙招 100%增寿
- 春季老年人心血管病高发 3条保命要诀
- 眼睛花不花要看四十八 老年人怎样延缓老花眼
- 香槟然能防治老年痴呆症? 一天三杯它人到90不痴呆
- 老人手抖的原因 为什么老人手会抖