
目录
- PXE实现无人值批量部署服务器
- 一、PXE概述
- 1.1 什么是PXE
- 1.2 什么是KickStart
- 1. 3 安装的必要条件
- 二、PXE工作原理
- 2.1 工作原理
- 2.2 本次实验环境
- 2.3 执行PXE+KiskStart安装需要准备内容
- 三、安装步骤
- 3.1 配置YUM源
- 3.2 关闭防火墙、selinux
- 3.3 安装DHCP 、tftp(tftp-server、xinetd)
- 3.3.1 安装dhcp、tftp-server、xinetd
- 3.3.2 配置DHCP服务
- 3.3.3 配置tftp服务
- 3.3.4 安装syslinux,拷贝pxelinux.0文件
- 3.4 编写kickstart.cfg配置文件
- 3.4.1安装system-config-kickstart
- 3.4.2 system-config-kickstart 界面配置
- 3.5 配置 HTTP镜像源
- 3.5.1 安装http
- 3.5.2 将iso 镜像文件挂在设置开机自启动
- 3.6 配置开机菜单 default
- 3.6.1 将ks6.cfg移动到 /var/www/html/ks
- 3.6.2 配置开机菜单
- 3.6.3 将客户机 设置网络启动(raid等),开机启动即可
- 四、总结
PXE实现无人值批量部署服务器
一、PXE概述
1.1 什么是PXEPEX (Pre-Boot Execution E nvironment 预启动执行环境),是一种引导方式,并不是一种安装方式 。基于 Client/Server的工作模式PXE在网卡的ROM 中,当计算机引导时,BIOS把PXE Client调入内存执行,PXE Client 将放置在远端的文件通过网络下载到本地运行 。
1.2 什么是KickStart【VMware实现PXE+kickstart无人值守安装Centos7系统的详细过程】KickStart 是一种无人值守的安装方式,KickStart 的工作原理是通过 记录典型的安装过程中记录所需要填写的各种参数(语言、时区、密码、分区、键盘等),并生成一个ks.cfg的文件 。(名字可以修改,默认ks.cfg)
在其后的安装过程中,当出现要求填写参数的情况时,安装程序会首先去查找KickStart 生成的文件,当找到合适的参数时,就采用找到的参数,当没有找到合适的参数,就会卡着,需要人工干预 。
如果KickStart 文件涵盖安装过程中所有需要填写的参数时,只需要告诉安装程序从何处取得 ks.cfg文件 。安装完毕后,安装程序会根据ks.cfg中设置的重启选项重启系统,并结束安装 。
1. 3 安装的必要条件BIOS 支持PXE,需要在BIOS开启
NIC 网卡支持
二、PXE工作原理
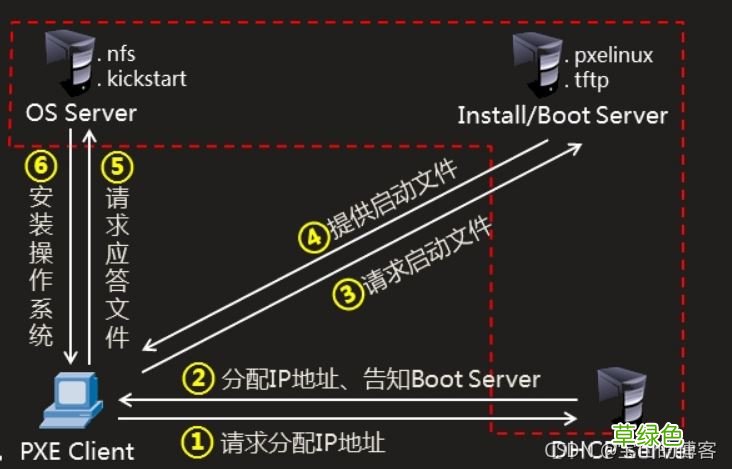
2.1 工作原理拓扑图
文章插图
PXE工作原理
1.首先 PXE Client 向 DHCP 服务器发起请求分配IP(网卡需要向DHCP请求地址,获取信息)
2. DHCP 除了给你分配地址外,还会给你分配 boot-loader name(引导程序的名字) 以及Tftp 服务器IP地址
3.网卡使用Tftp 的客户端,向tftp服务器发起请求,把引导程序(pxelinux.0)加载到内存中来
4.然后 BIOS会执行这个引导程序 。
5.引导程序会 boot-loader会从tftp去查找它的配置文件(default)
6.根据配置文件来引导
2.2 本次实验环境实验环境
主机名网络模式IP地址 Server仅主机
vmware 需要关闭DHP10.0.0.100 Client仅主机DHCP分配
2.3 执行PXE+KiskStart安装需要准备内容
- DHCP 服务器 用来给客户机分配IP
- TFTP 服务器 用来存放PXE 的相关文件:系统引导文件
- FTP|NFS|HTTP服务器 用来存放系统安装文件
- KickStart所生成的ks.cfg配置文件
- 带有一个 PXE支持网卡的 将安装的 主机
三、安装步骤
3.1 配置YUM源YUM 源配置
[root@Server~]# cd /etc/yum.repos.d/[root@Server/etc/yum.repos.d]# lsrivers.repo[root@Server/etc/yum.repos.d]# mv rivers.repo rivers.repo.bak[root@Server/etc/yum.repos.d]# vim dvd.repo[development]name=Centos7.6baseurl=file:///mntenabled=1gpgcheck=0[root@Server~]# mount /dev/cdrom /mnt/mount: /dev/sr0 is write-protected, mounting read-only[root@Server~]# [root@Server~]# yum clean allLoaded plugins: fastestmirrorCleaning repos: developmentOther repos take up 137 M of disk space (use --verbose for details)[root@Server~]#
3.2 关闭防火墙、selinux关闭防火墙、selinux
[root@Server~]# systemctl disable firewalld --now[root@Server~]#setenforce 0# selinux 开机才生效,setenforce 0 临时关闭
3.3 安装DHCP 、tftp(tftp-server、xinetd)
3.3.1 安装dhcp、tftp-server、xinetd安装dhcp、tftp-server
[root@Server~]# yum -y install dhcp tftp-server xinetdLoaded plugins: fastestmirrorLoading mirror speeds from cached hostfileResolving Dependencies--> Running transaction check---> Package dhcp.x86_64 12:4.2.5-68.el7.centos.1 will be installed……
3.3.2 配置DHCP服务配置DHCP文件
# 1.进入 dhcp目录[root@Server~]# cd /etc/dhcp/[root@Server/etc/dhcp]# lsdhclient.ddhcpd6.confscriptsdhclient-exit-hooks.ddhcpd.conf# 2.查看默认配置文件,是空的,但是/usr/share/doc/dhcp*/目录下有配置模板,我们可以拷贝[root@Server/etc/dhcp]# cat dhcpd.conf ## DHCP Server Configuration file.#see /usr/share/doc/dhcp*/dhcpd.conf.example#see dhcpd.conf(5) man page#[root@Server/etc/dhcp]# # 3.拷贝dhcpd 配置模板文件[root@Server/etc/dhcp]# cp /usr/share/doc/dhcp-4.2.5/dhcpd.conf.example /etc/dhcp/dhcpd.confcp: overwrite ‘/etc/dhcp/dhcpd.conf'? y# 4. 修改dhcp 文件,(这里可以不用拷贝配置文件,直接复制下面一段 。subnet--filename)# A slightly different configuration for an internal subnet.subnet 10.0.0.0 netmask 255.255.255.0 {range 10.0.0.120 10.0.0.200;option domain-name-servers 10.0.0.5, 10.0.0.6;option domain-name "example.com";option routers 10.0.0.254;option broadcast-address 10.0.0.255;default-lease-time 600;max-lease-time 7200;next-server 10.0.0.100;filename "pxelinux.0";}subnet 10.0.0.0 netmask 255.255.255.0 #宣告网段range 10.0.0.120 10.0.0.200;#分配地址范围option domain-name-servers:#dns配置,正常公司会有2个DNS我这里随意配的option routers 10.0.0.254; # 设置网关的option broadcast-address 10.0.0.255; # 设置广播地址default-lease-time 600;# 默认租约时间,它的单位为秒max-lease-time 7200;#最大租约时间,它的单位为秒next-server 10.0.0.100;# tftp-server IP地址filename "/pxelinux.0"; # 网络启动程序,(网络引导)# 5. 启动dhcp 服务器,[root@Server/etc/dhcp]# systemctl enable dhcpdCreated symlink from /etc/systemd/system/multi-user.target.wants/dhcpd.service to /usr/lib/systemd/system/dhcpd.service.[root@Server/etc/dhcp]# systemctl start dhcpd[root@Server/etc/dhcp]#[root@Server/etc/dhcp]# netstat -lantup|grep :67udp 00 0.0.0.0:670.0.0.0:*8503/dhcpd[root@Server/etc/dhcp]# [root@Server/etc/dhcp]# cd[root@Server~]#@补充:如果全局配置了,子配置没配置,那么将读取全局设置如果全局配置了,子的也配置了,那么将以自配置为准 。
3.3.3 配置tftp服务开启tftp服务
# 1.修改tftp配置文件[root@Server~]# vim /etc/xinetd.d/tftp 将disable = no 改为 yes#重启 xinetd[root@Server~]# systemctl restart xinetd.service[root@Server~]# netstat -lntup|grep :69udp 00 0.0.0.0:690.0.0.0:*9071/xinetd[root@Server~]#
3.3.4 安装syslinux,拷贝pxelinux.0文件配置tftp-server在哪里
# 1.查找 pxelinux.0文件是那个包提供的[root@Server~]# yum provides "*/pxelinux.0"Loaded plugins: fastestmirrorLoading mirror speeds from cached hostfilesyslinux-4.05-15.el7.x86_64 : Simple kernel loader...: which boots from a FAT filesystemRepo : developmentMatched from:Filename: /usr/share/syslinux/pxelinux.0syslinux-tftpboot-4.05-15.el7.noarch : SYSLINUX...: modules in /var/lib/tftpboot, available for...: network bootingRepo : developmentMatched from:Filename: /var/lib/tftpboot/pxelinux.0# 2.安装syslinux包,然候拷贝pxelinux.0文件到 tftp-server目录[root@Server~]# yum -y install syslinux[root@Server~]# rpm -ql syslinux|grep pxe/usr/share/doc/syslinux-4.05/pxelinux.txt/usr/share/syslinux/gpxecmd.c32/usr/share/syslinux/gpxelinux.0/usr/share/syslinux/gpxelinuxk.0/usr/share/syslinux/pxechain.com/usr/share/syslinux/pxelinux.0[root@Server~]# # 3. 拷贝pxelinux.0 文件到 tftp-server 目录[root@Server~]# cp /usr/share/syslinux/pxelinux.0 /var/lib/tftpboot/[root@Server/var/lib/tftpboot]# lspxelinux.0# 4.创建一个目录,用来放启动配置文件 default的[root@Server/var/lib/tftpboot]# mkdir pxelinux.cfg[root@Server/var/lib/tftpboot]# lspxelinux.cfgpxelinux.0[root@Server/var/lib/tftpboot]# cd pxelinux.cfg[root@Server/var/lib/tftpboot/pxe.cfg]# pwd/var/lib/tftpboot/pxelinux.cfg# 5.将 /mnt/isolinux/目录下面的所有文件都考到 /var/lib/tftpboot下面[root@Server/var/lib/tftpboot]# cd --[root@Server~]# cd /mnt/isolinux/[root@Server/mnt/isolinux]# cp -a isolinux.cfg/var/lib/tftpboot/pxelinux.cfg/default[root@Server/mnt/isolinux]#cp * /var/lib/tftpboot/验证
文章插图
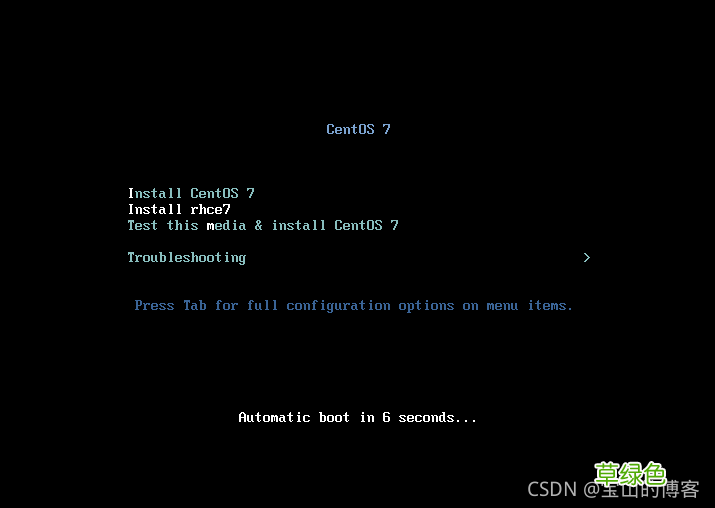
1.客户端启动系统,选择从网卡启动
2.就会从DHCP服务器(10.0.0.81)中获取IP地址,同时还获取了 tftp-server IP(10.0.0.81)地址和网络引导程序(pxelinux.0)
3.通过网卡读取到tftp-server(/var/lib/tftpboot目录)上的pxelinux.0,读取到内存中
4.在内存中执行引导程序
5.读取引导程序的配置文件(/var/lib/tftpboot/pxe.cfg/default)
3.4 编写kickstart.cfg配置文件
3.4.1安装system-config-kickstart安装 system-config-kickstart
[root@Server/etc/yum.repos.d]#cd --# 1. 安装system-config-kickstart[root@Server~]# yum -y install system-config-kickstart已加载插件:fastestmirror, langpacksLoading mirror speeds from cached hostfile……#2. 启动界面,配置ks.cfg[root@Server~]# system-config-kickstart 详解界面如下:
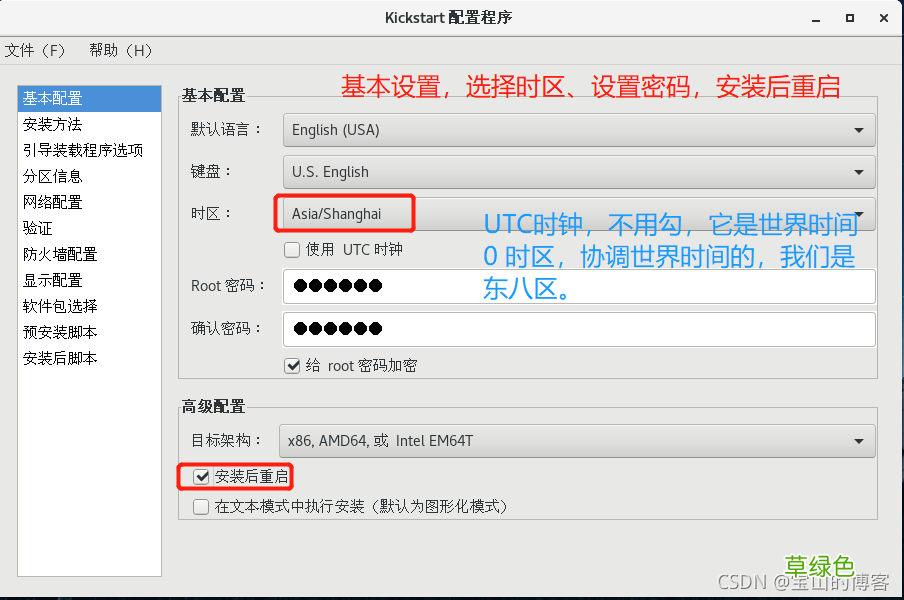
3.4.2 system-config-kickstart 界面配置基本配置(默认语言、键盘、时区、密码、安装后重启)
文章插图
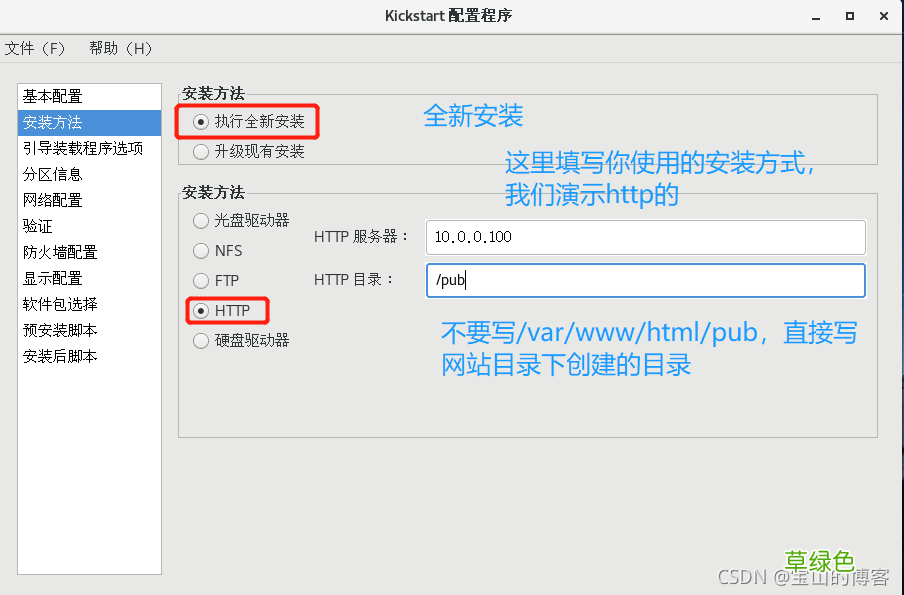
安装方法(全新安装、HTTP安装方式)
文章插图
安装新引导装载程序
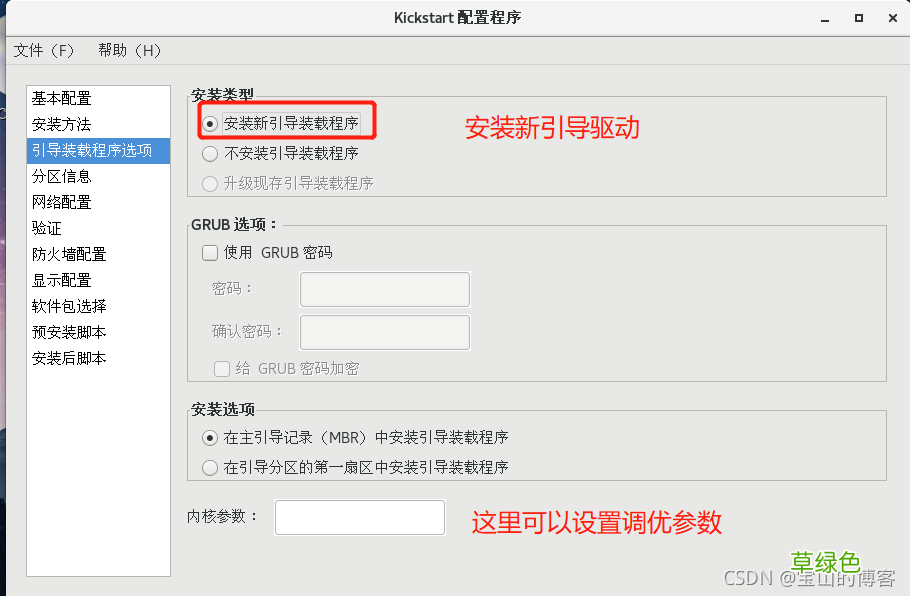
文章插图
分区信息
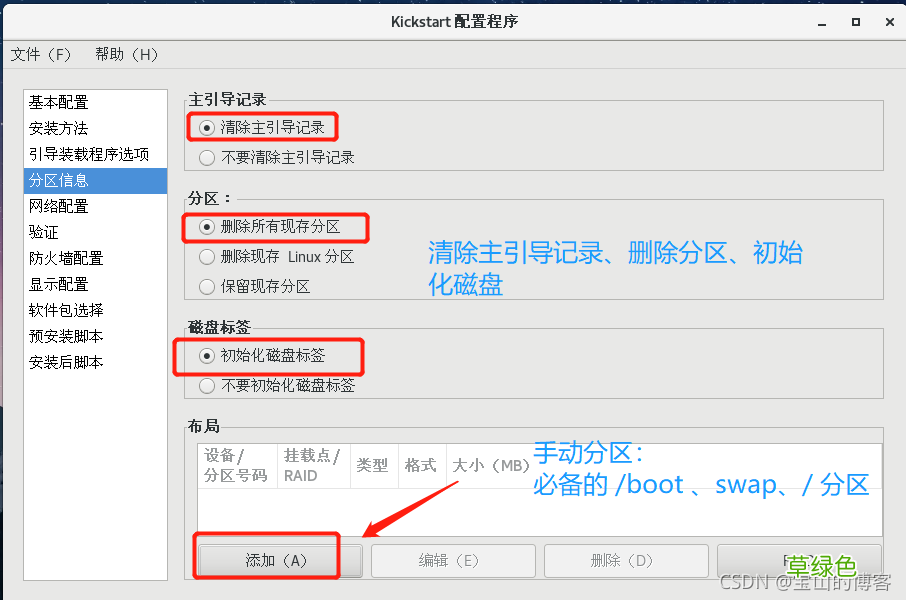
文章插图
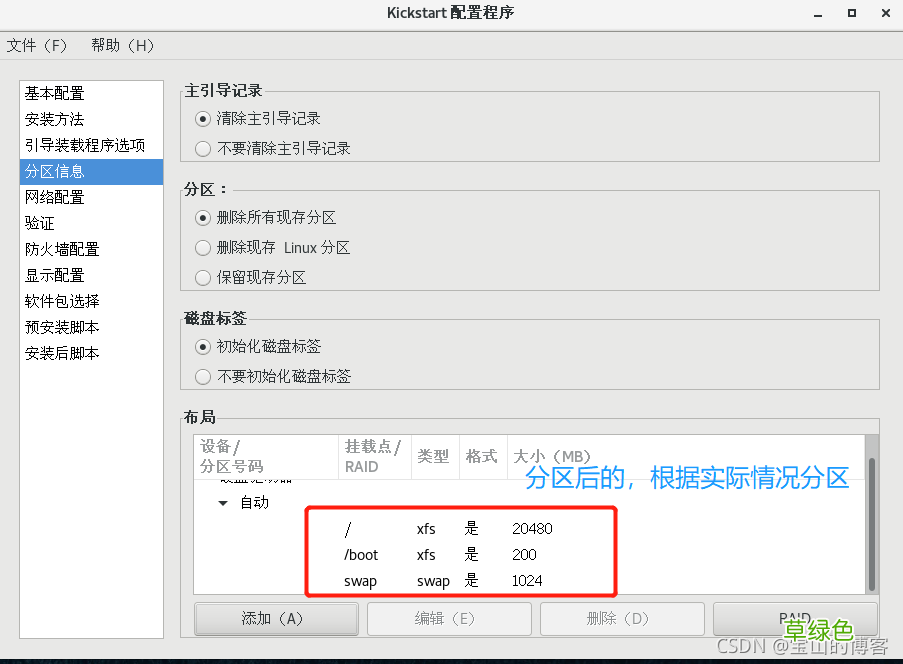
文章插图
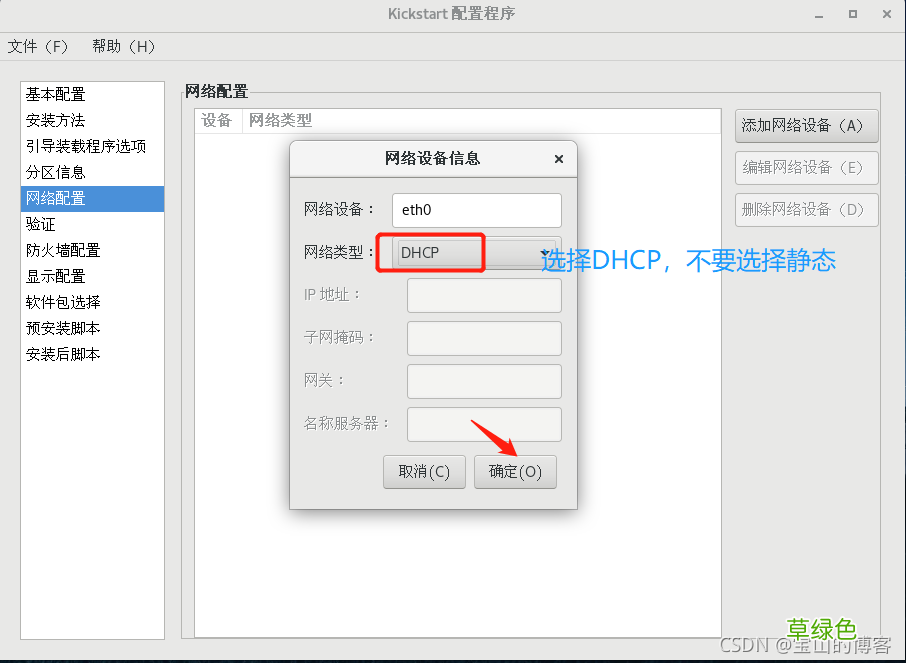
网络配置
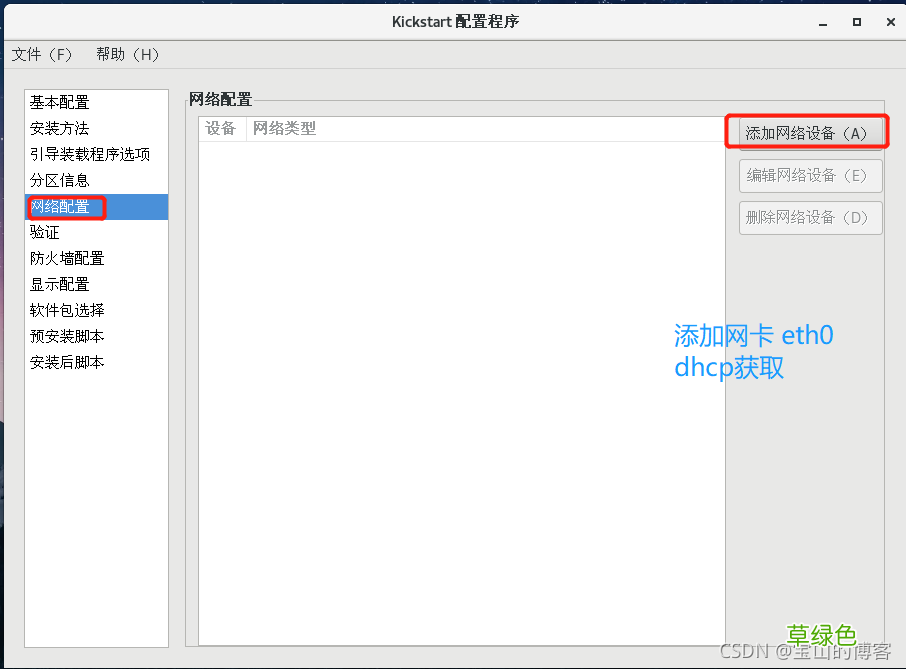
文章插图
文章插图
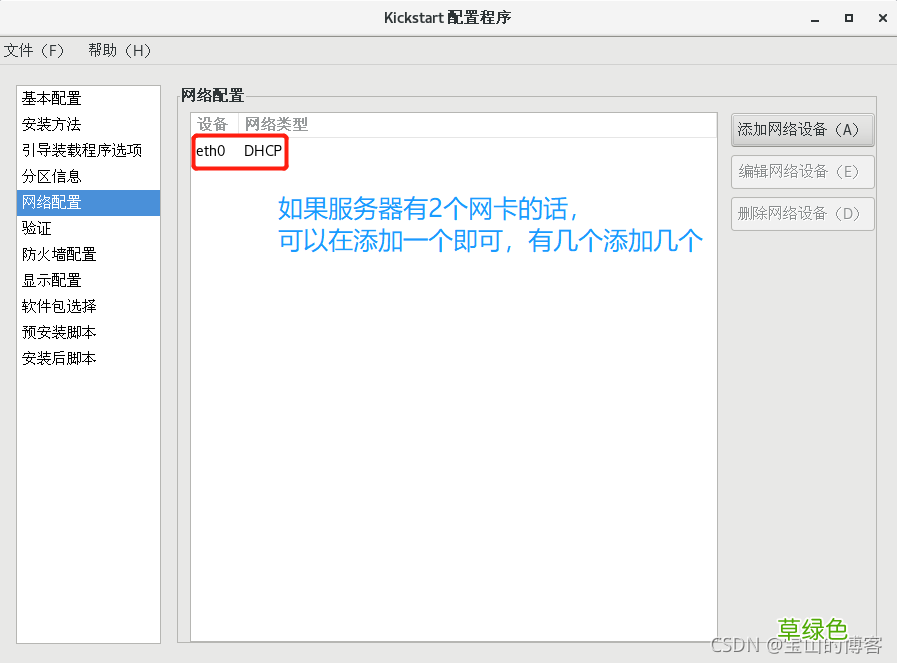
文章插图
防火墙配置
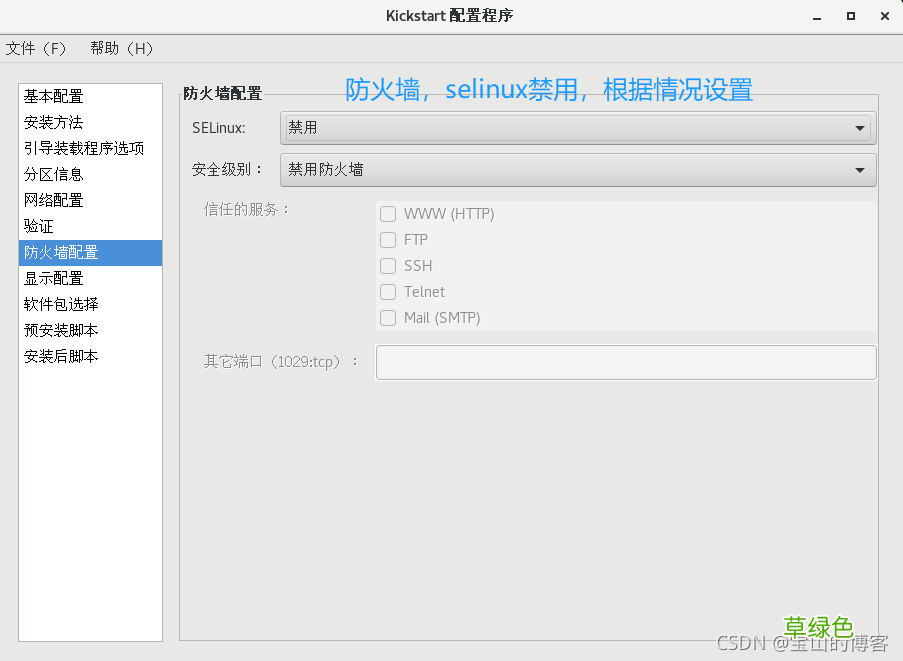
文章插图
显示配置(是否安装图形界面)
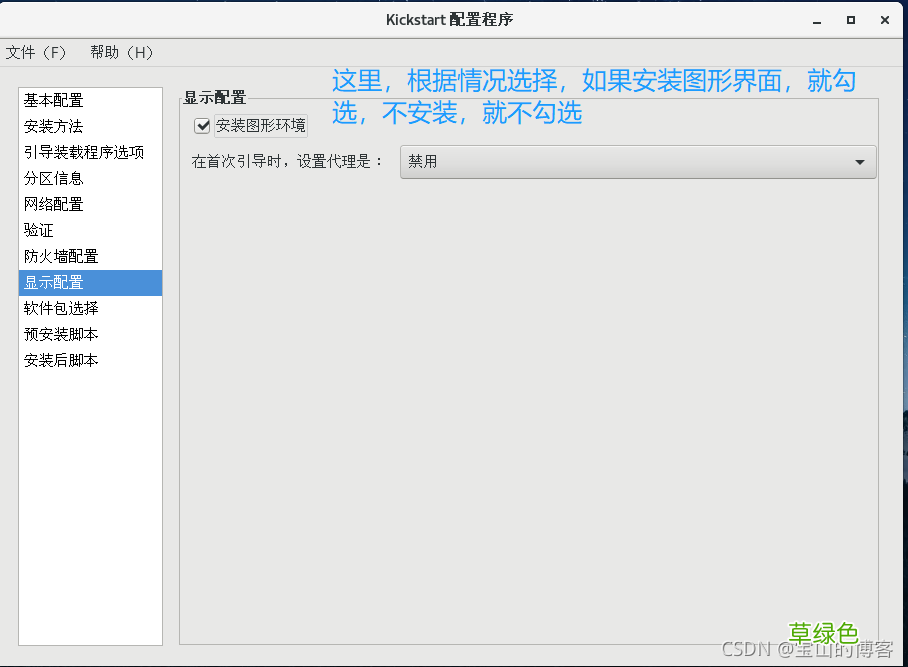
文章插图
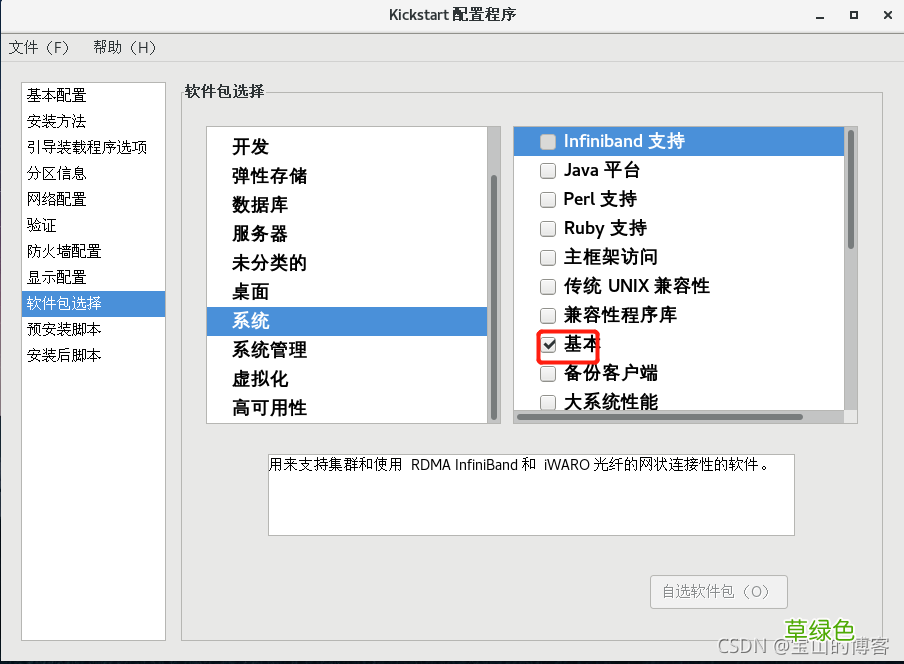
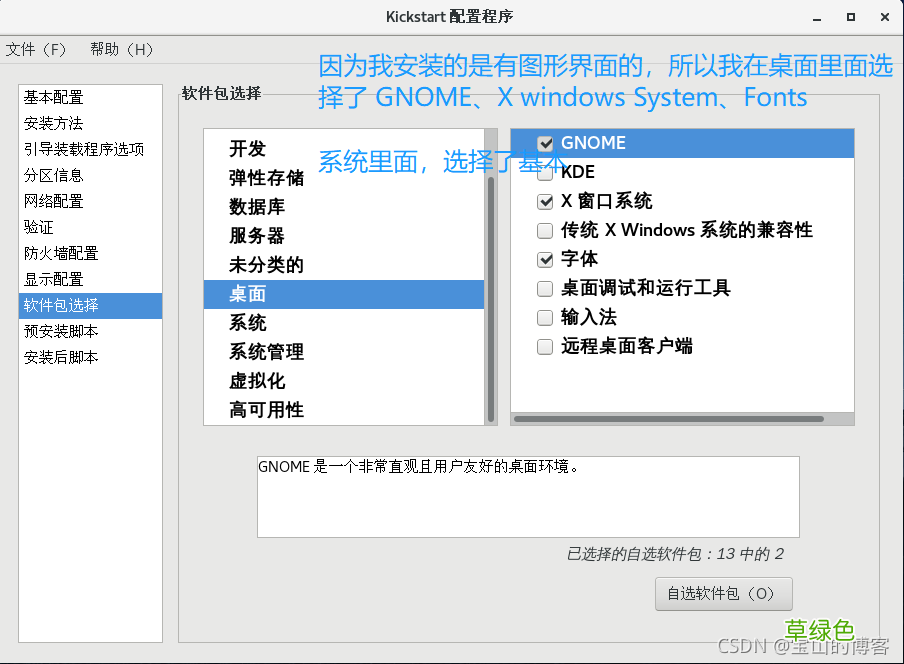
软件包安装选择
文章插图
文章插图
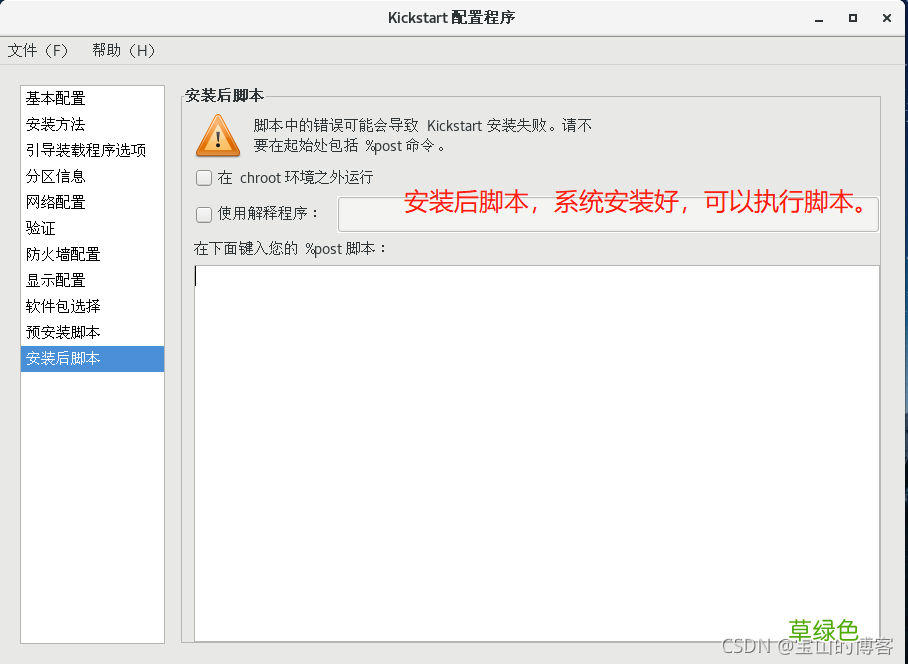
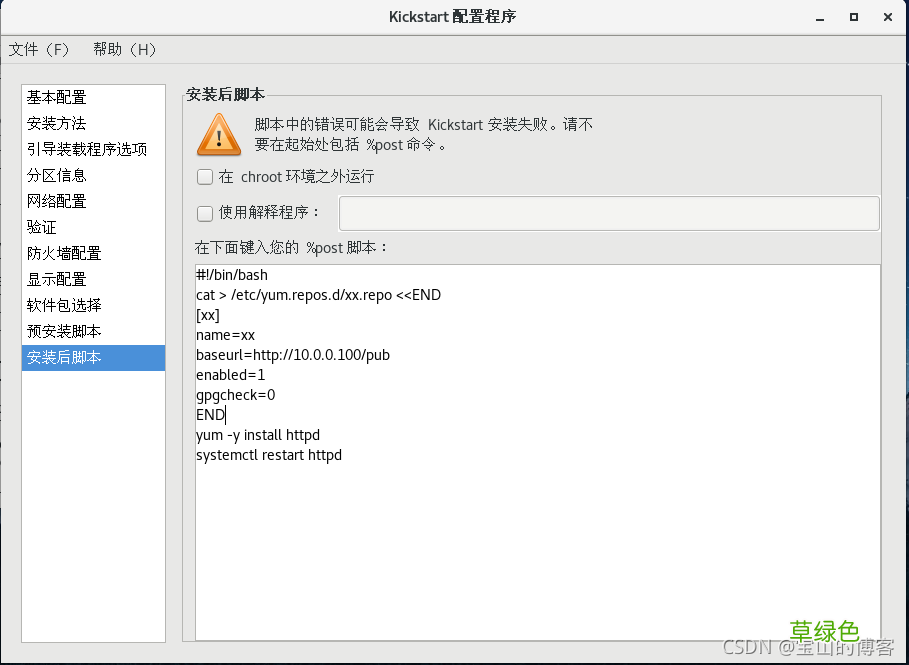
安装后脚本
文章插图
文章插图
保存
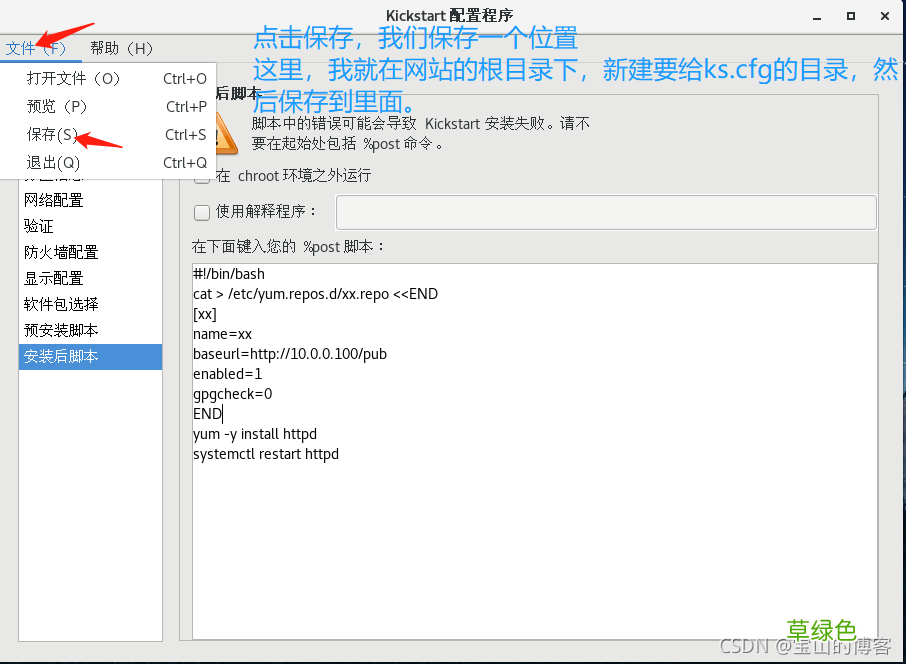
文章插图
3.5 配置 HTTP镜像源
3.5.1 安装http安装httpd
# 1. 安装httpd[root@Server ~]# yum -y install httpd已加载插件:fastestmirror, langpacksLoading mirror speeds from cached hostfile……# 2.设置开启自动、启动服务[root@Server ~]# systemctl enable httpd[root@Server ~]# systemctl start httpd#3. 创建 目录[root@Server ~]# cd /var/www/html[root@Server/var/www/html]# mkdir ks.cfg [root@Server/var/www/html]# mkdir pub# 4.修改yum 源,将本地改为http[root@Server/var/www/html]# cd[root@Server~]# cat /etc/yum.repos.d/dvd.repo[development]name=rhce7baseurl=http://10.0.0.100/pubenabled=1gpgcheck=0[root@Server~]#
3.5.2 将iso 镜像文件挂在设置开机自启动设置iso开机自启动
# 1. 在末尾添加以下一条信息 。[root@Server~]# vim /etc/fstab /dev/cdrom/var/www/html/pubiso9660defaults,loop 0 0[root@Server~]# tail -1 /etc/fstab /dev/cdrom/var/www/html/pubiso9660defaults,loop 0 0[root@Server~]# # 2.挂载镜像[root@Server~]# mount -a# 3.用火狐浏览器访问下,如果可以访问,则说明http 镜像源没有问题[root@Server~]# firefox http://10.0.0.100/pub &@ 7版本上,模式可以识别loop,defaults,loop 后面的loop可以省略
3.6 配置开机菜单 default
3.6.1 将ks6.cfg移动到 /var/www/html/ks移动ks6.cfg
# 1.将我们保存在root目录中的cfg移动到 /var/www/html/ks.cfg/[root@Server~]# mv ks6.cfg /var/www/html/ks.cfg/[root@Server/var/www/html/ks.cfg]# lsks6.cfg [root@Server/var/www/html/ks.cfg]#
3.6.2 配置开机菜单编写defautl文件
[root@Server~]# cd /var/lib/tftpboot/pxelinux.cfg/[root@Server/var/lib/tftpboot/pxelinux.cfg]# lsdefault# 1.编写default文件,此时在原本的label linux 添加以下内容,# 并删除label check里面的 menu defalut(默认启动方式,设置了,就不需要选择,默认启动选项)[root@Server/var/lib/tftpboot/pxelinux.cfg]# vim default label rhce7menu label ^Install rhce7menu defaultkernel vmlinuzappend initrd=initrd.img ks=http://10.0.0.100/ks.cfg/ks6.cfg# 2.可以修改下默认的时间,默认是 600(单位是600秒的十分之一,就是60s)# 这里我设置60,就是6stimeout 60-------------------参数介绍efault vesamenu.c32# 这是必须项,或者使用menu.c32timeout 60# 超时等待时间,60秒内不操作将自动选择默认的菜单来加载display boot.msg# 这是为选项提供一些说明的文件# Clear the screen when exiting the menu, instead of leaving the menu displayed.# For vesamenu, this means the graphical background is still displayed without# the menu itself for as long as the screen remains in graphics mode.menu clearmenu background splash.png# 背景图片menu title CentOS 7# 大标题menu vshift 8……label linuxmenu label ^Install CentOS 7# 菜单文字kernel vmlinuz # 内核文件路径,注意相对路径是从tftp的根路径/tftpboot开始的append initrd=initrd.img inst.stage2=hd:LABEL=CentOS\x207\x20x86_64 quiet# 内核启动选项,其中包括initrd的路径,同样要改为"ks=http://10.0.0.100/ks.cfg/ks6.cfg"menu default# menu default表示开机时光标一开始默认停留在此label上# 一般pxe环境下此路径直接指向系统安装文件的路径,具体做法见下文示例# utilities submenu# 子菜单项的设置方法menu begin ^Troubleshootingmenu title Troubleshooting
3.6.3 将客户机 设置网络启动(raid等),开机启动即可
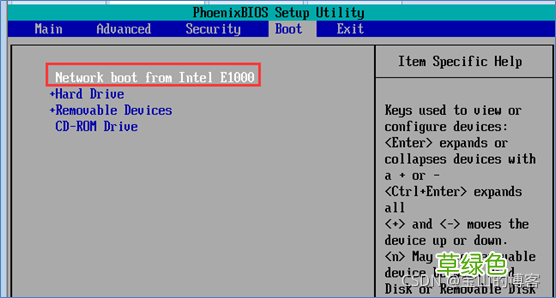
文章插图
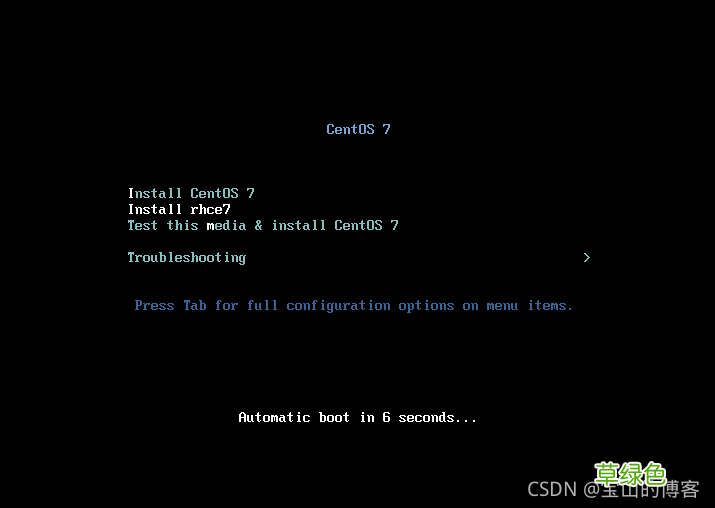
文章插图
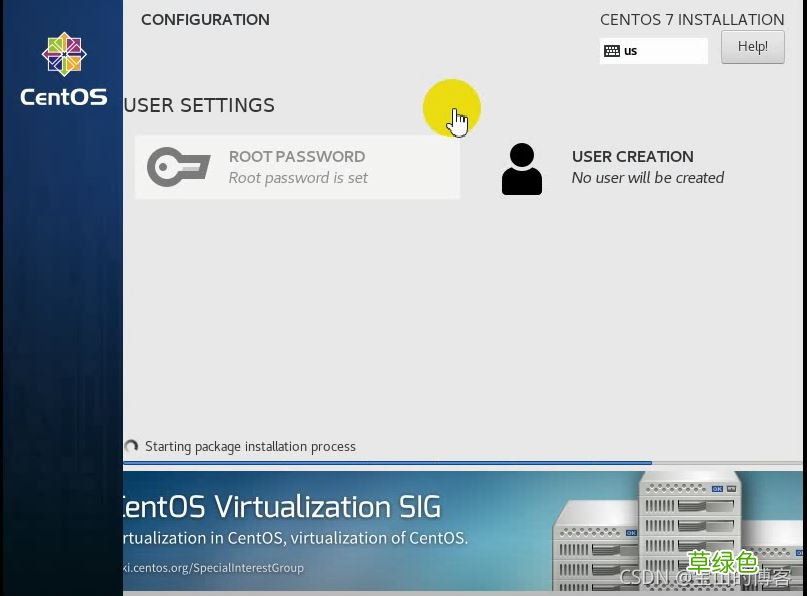
文章插图
文章插图
四、总结所谓的无人值守,就是自动应答,当安装过程中需要人机交互提供某些选项的答案时(如如何分区),自动应答文件可以根据对应项自动提供答案 。但是,无人值守并不完全是无人值守,至少设置bios从网卡启动是必须人为设置的,且安装完系统后设置不从网卡启动也是需要人为设置的 。除此之外,其他的基本上都可以实现无人值守安装 。
在部署时,建议使用 Kickstart+DHCP+HTTP(FTP)+TFTP,安装dhcp、tftp-server、xinetd、httpd、system-config-kickstart等软件 。
在真实环境中,通常我们会发现一台服务器好几块硬盘,做完raid,整个硬盘有等10T,如果来使用kickstart自动安装并分区呢;一般服务器硬盘超过2T,如何来使用kickstart安装配置呢?这里就不能使用MBR方式来分区,需要采用GPT格式来引导并分区 。需要在ks.cfg末尾添加如下命令来实现需求:
%pre parted -s /dev/sdb mklabel gpt%end到此这篇关于VMware实现PXE+kickstart无人值守安装Centos7系统的文章就介绍到这了,更多相关VMware无人值守安装Centos7系统内容请搜索考高分网以前的文章或继续浏览下面的相关文章希望大家以后多多支持考高分网!
- 春季老年人吃什么养肝?土豆、米饭换着吃
- 三八妇女节节日祝福分享 三八妇女节节日语录
- 老人谨慎!选好你的“第三只脚”
- 校方进行了深刻的反思 青岛一大学生坠亡校方整改校规
- 脸皮厚的人长寿!有这特征的老人最长寿
- 长寿秘诀:记住这10大妙招 100%增寿
- 春季老年人心血管病高发 3条保命要诀
- 眼睛花不花要看四十八 老年人怎样延缓老花眼
- 香槟然能防治老年痴呆症? 一天三杯它人到90不痴呆
- 老人手抖的原因 为什么老人手会抖